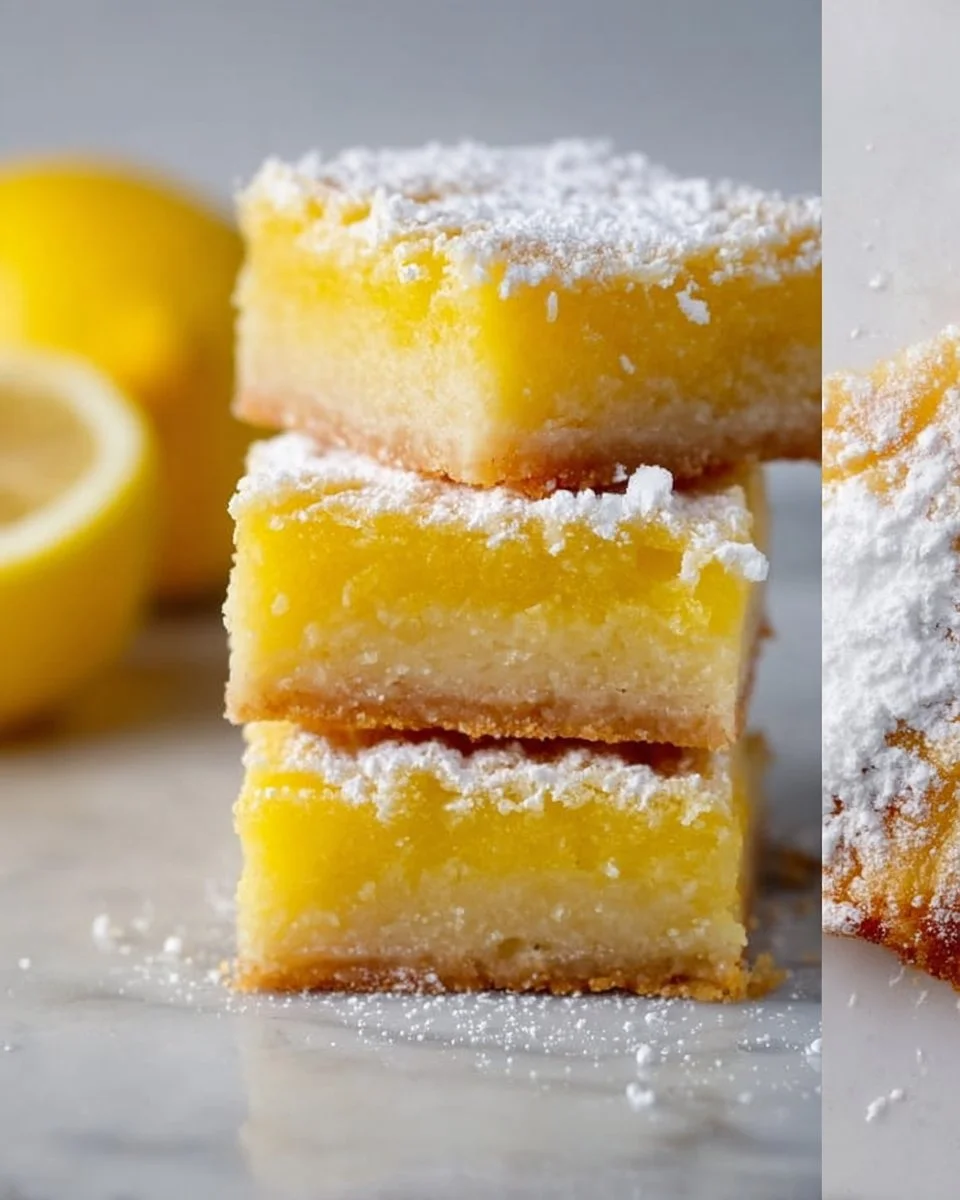
There’s something truly special about a well-made lemon bar. The first bite offers a delightful contrast between the buttery, tender crust and the bright, zesty filling, creating a tangy and sweet experience that dances on your palate. It’s a symphony of textures and flavors that brings a smile every time I make them. These bars are a staple in my kitchen, perfect for spring gatherings or whenever I need a little sunshine in my life.
I’ve found that this recipe comes together surprisingly fast, making it an ideal choice for busy weekend baking or last-minute treats. They’re wonderfully versatile, too! Whether served as a refreshing dessert after a heavy meal or simply enjoyed with afternoon tea, they’re bound to brighten anyone’s day. Oh, and if you have leftovers (which is rare!), they store beautifully for a few days.
Why I Love The Best Lemon Bar Recipe
There’s nothing like The Best Lemon Bar Recipe to lift your spirits! This treat perfectly hits that sweet spot between tart and sweet, and honestly, it’s incredibly easy and undeniably delicious. With its simple ingredient list and no-fuss technique, it’s a true winner at my table. Each time I serve them, they vanish in a heartbeat, leaving everyone asking for more!
The Best Lemon Bar Recipe Ingredients
The magic of this lemon bar recipe truly lies in the combination of fresh ingredients and the balance between the crust and the filling. Don’t worry about exact measurements just yet; those are all in the recipe card for you!
Essential Components
- 1/2 CUP UNSALTED BUTTER (SOFTENED): The rich base of our crust—provides that indulgent flavor and tender texture.
- 1/4 CUP POWDERED SUGAR: Adds sweetness to the crust while contributing to a melt-in-your-mouth quality.
- 1 CUP ALL-PURPOSE FLOUR: The backbone of the crust; it creates structure while remaining tender.
- PINCH SALT: Balances the sweetness and enhances the overall flavor.
- 3 LARGE EGGS: These little wonders bind everything together and give the filling its lovely texture.
- 1 CUP GRANULATED SUGAR + 2 TABLESPOONS OF GRANULATED SUGAR: The first measure sweetens the filling, while the second is for the crust—both crucial for that perfect balance.
- 1/2 CUP FRESH LEMON JUICE: The star of our show! It brings that essential brightness and tartness.
- 1 TABLESPOON LEMON ZEST: Adds a burst of aromatic citrus flavor that deepens the lemony goodness.
- 1/4 CUP ALL-PURPOSE FLOUR (SIFTED): Thickens the filling and ensures a smooth consistency.
- POWDERED SUGAR (FOR DUSTING): The finishing touch that gives them a delightful presentation!
Substitutions and Tips
Need a swap? If you’re short on fresh lemons, you could use bottled lemon juice, though it won’t be quite as vibrant. For a gluten-free option, almond flour works well, but be aware the texture will change slightly. Want to mix things up? A dash of vanilla extract in the filling adds a delightful twist, while using lime juice offers a refreshing change.
• Be sure to sift your flour when adding to the filling; this keeps it light and airy.
• If you prefer, you can make the crust ahead of time and let it chill to develop more flavor.
Kitchen Tools You’ll Need
- 8×8 inch baking pan (throw in a Pyrex one for easy monitoring)
- Parchment paper (for lining the pan)
- Medium mixing bowls (two for separating crust and filling)
- Whisk (for mixing the egg filling)
- Measuring cups (for precise pours)
- Rubber spatula (for scraping every last bit!)
- Sifter (optional but highly recommended)
How to Make The Best Lemon Bar Recipe
Let’s dive into creating this zesty lemon bar recipe. I’ve broken down the process into simple steps, so follow along, and you’ll have a delicious dessert in no time. We’re aiming for that perfect balance of tangy and sweet, topped with a light dusting of powdered sugar.
Preheat and Prepare
First, preheat your oven to 350°F (175°C) and line your 8×8 inch baking pan with parchment paper, leaving an overhang on the sides for easy removal later. This little step is key to a seamless lift once they’re baked.
Cream the Butter and Sugar
Next, in a medium bowl, cream together the softened butter and powdered sugar until light and fluffy. This is important for that soft texture we love! You want it to be creamy and pale to ensure the right foundation for the crust.
Mix the Dry Ingredients
Now, add the flour and salt, and mix until just combined. Overmixing can lead to a tougher crust, so we’re keeping it gentle here. You want the dough to be soft and slightly crumbly.
Press and Bake the Crust
Press the dough evenly into the bottom of the prepared pan. It should fill the corners well but maintain a slight thickness. Bake the crust for about 13-14 minutes, or until the edges are slightly golden brown. Trust me, the aroma wafting through your kitchen will have everyone buzzing!
Whisk Together the Filling
While the crust is baking, go ahead and make the filling. In another bowl, whisk together the eggs, granulated sugar, lemon juice, lemon zest, and flour until smooth and well combined. This filling is where the magic happens, so mix until it’s beautifully golden and aromatic.
Pour and Bake Again
Pour the lemon mixture over the warm crust, spreading it out evenly. Now return the pan to the oven and bake for an additional 20-22 minutes, or until the filling is set and the edges are lightly golden brown. You want just a slight jiggle in the center when you give it a shake!
Cool and Dust
Once baked, remove the pan from the oven and let the bars cool completely in the pan. Patience pays off here! Once cooled, dust the top generously with powdered sugar. This will create a beautiful contrast against the vibrant filling.
Slice and Enjoy!
Finally, use the parchment paper overhang to lift the bars out of the pan. Carefully slice them into squares, and enjoy every zesty bite!
How to Store The Best Lemon Bar Recipe
If you happen to have any leftover lemon bars (which, as I mentioned, doesn’t often happen), they’ll last beautifully! Store them at room temperature for up to 2 days, or pop them in the refrigerator in an airtight container for up to 3-4 days. You can even freeze them for 2-3 months—just thaw overnight in the fridge before enjoying! For a quick treat, simply enjoy them chilled or at room temperature.
Tips for Success
- Use fresh lemon juice for the best flavor.
- Don’t overbake the filling; it should be set with a slight jiggle.
- Sift your flour to avoid any lumps.
- Always let the bars cool completely before slicing for clean edges.
- Add an extra zest sprinkle just before serving for a pop of flavor.
- A light hand when mixing makes for the perfect texture—no one likes tough bars!
Serving Suggestions
- Pair with a dollop of whipped cream or a scoop of vanilla ice cream.
- Serve alongside a refreshing cup of herbal tea for an afternoon treat.
- Garnish with fresh berries for a lovely color contrast.
- Drizzle with a sweet lemon glaze for an extra layer of flavor.
- Slice small for a delightful addition to a brunch spread.
Enjoy this lemony delight, and don’t forget to share some with friends (or keep them all to yourself—I won’t judge)!