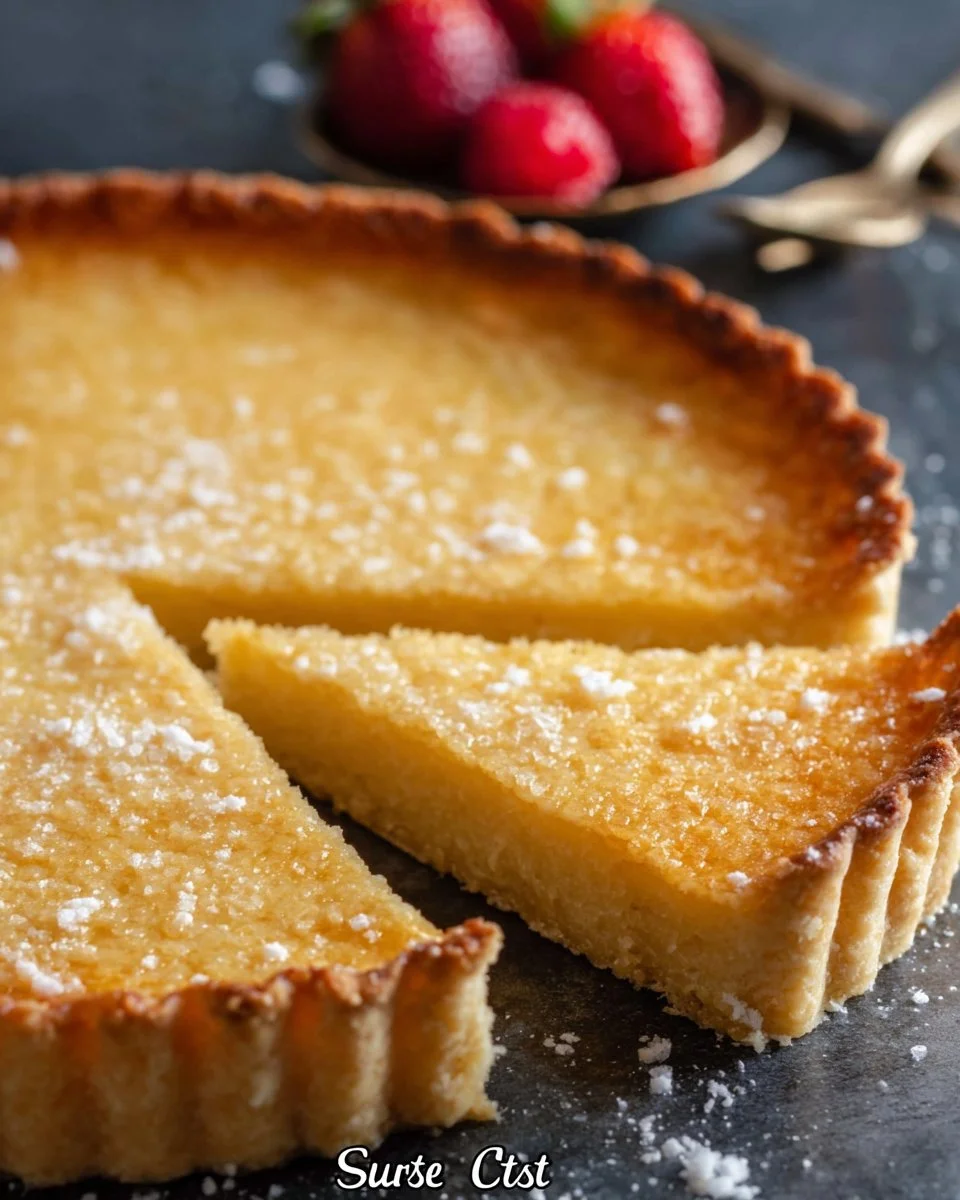
There’s something truly special about sitting down to a beautifully crafted tart, its crust perfectly golden and flaky. The tantalizing aroma wafting through the kitchen beckons you closer, and the texture—crisp yet tender—delivers a satisfying crunch with each bite. Honestly, creating this homemade tart crust is a staple in my kitchen, especially for special occasions or when I want to indulge in a slice of elegance.
I’ve found that this tart crust comes together surprisingly fast, making it perfect for those busy weekends when you want to impress without the stress. Its versatility knows no bounds; you can fill it with luscious pastry cream, vibrant fresh fruits, or even rich chocolate ganache. Oh, and if you happen to have any leftovers (which is rare, trust me!), it keeps well in the fridge for a couple of days.
WHY I LOVE HOMEMADE TART CRUST
There’s something about a Homemade Tart Crust that hits that sweet spot between ease and elegance. It’s incredibly easy and undeniably delicious, which makes it a true winner at my table. Whether it’s a classic fruit tart or a decadent chocolate dessert, this crust elevates any filling with its flaky texture and buttery flavor. Each bite whispers of homemade love, and honestly, who doesn’t deserve that?
HOMEMADE TART CRUST INGREDIENTS
The magic of this tart crust truly lies in its simple yet harmonious ingredients. Don’t worry about exact measurements just yet; those are all in the recipe card for you!
Core Ingredients and Their Roles
- 1 1/4 CUPS ALL-PURPOSE FLOUR: These little gems are the backbone of your crust, providing structure and body for that delightful crunch.
- 1/4 CUP GRANULATED SUGAR: Adds a hint of sweetness that perfectly balances the buttery flavor.
- 1/2 CUP UNSALTED BUTTER, CHILLED AND CUBED: This is where the magic happens—the chilled butter brings richness and that irresistible flaky texture to the crust.
- 1/4 TEASPOON SALT: Just a pinch enhances the other flavors beautifully, making this crust exceptionally delicious.
- 1 EGG YOLK: Helps bind everything together while adding richness that brings a lovely depth.
- 2-3 TABLESPOONS COLD WATER: This is your secret weapon, helping to bring the dough together without making it tough.
SUBSTITUTIONS AND TIPS
Want to switch things up? Here are a few ingredient substitutions you might consider:
- Gluten-Free Flour: If you need a gluten-free option, substitute with a 1:1 gluten-free baking flour blend. It may change the texture slightly, but it works quite well!
- Brown Sugar: For a deeper flavor, use brown sugar instead of granulated sugar; it’ll give your crust a lovely caramel nuance.
- Vegetable Shortening: In a pinch, you can replace the butter with vegetable shortening for a dairy-free crust, though it won’t be quite as rich.
- Chill the Dough: Don’t skip refrigerating the dough! It ensures your crust stays flaky. You can even make it a day ahead and keep it wrapped in the fridge.
KITCHEN TOOLS YOU’LL NEED
- Mixing bowl (medium-sized)
- Food processor (optional, for quicker mixing)
- Rolling pin
- Tart pan (9-inch or 10-inch)
- Plastic wrap
- Fork (for pricking the crust)
- Parchment paper (for baking)
HOW TO MAKE HOMEMADE TART CRUST
Let’s dive into creating this wonderfully flaky Homemade Tart Crust. I’ve broken down the process into simple steps, so follow along, and you’ll have a delicious crust in no time. We’re aiming for a perfectly golden, flaky base that will hold your favorite delicious fillings.
Mix the Dry Ingredients
In a mixing bowl, combine flour, sugar, and salt. This step is key to ensuring every bite of your tart crust is evenly flavored. Give it a little stir to let those ingredients mingle.
Cut in the Butter
Cut in the chilled butter until the mixture resembles coarse crumbs. You want small pieces of butter to remain, as they create that delightful flakiness. If you’re using a food processor, pulse it gently—be careful not to overmix!
Bind with Egg Yolk
Next, add the egg yolk and mix until just combined. This helps bind the mixture while keeping it tender. You’re looking for a loose dough that holds together nicely.
Gradually Add Cold Water
Now, gradually add cold water, one tablespoon at a time, until the dough comes together. You might need 2 to 3 tablespoons, depending on humidity. This will help create that lovely cohesive texture.
Chill the Dough
Flatten the dough into a disk, wrap it in plastic, and refrigerate for at least 30 minutes. This waiting period allows the gluten to relax, ensuring your crust won’t shrink in the oven.
Preheat and Prepare
While the dough is chilling, preheat your oven to 375°F (190°C). This will ensure it’s hot enough to create a lovely golden crust when you bake it.
Roll Out the Dough
Once chilled, roll out the dough on a floured surface until it’s about 1/8 inch thick. You want it thin but sturdy enough to hold your filling. Think of it as the canvas for your delicious masterpiece!
Transfer to Tart Pan
Next, transfer the rolled-out dough to your tart pan. Gently press it into the corners and trim any excess hanging over the edges. It’s okay if you have to patch a few areas—just make sure it looks neat!
Prick and Bake
Prick the bottom with a fork to prevent it from puffing up while baking. Bake for 20-25 minutes or until golden brown. You want a nice crisp crust that will beautifully hold your fillings.
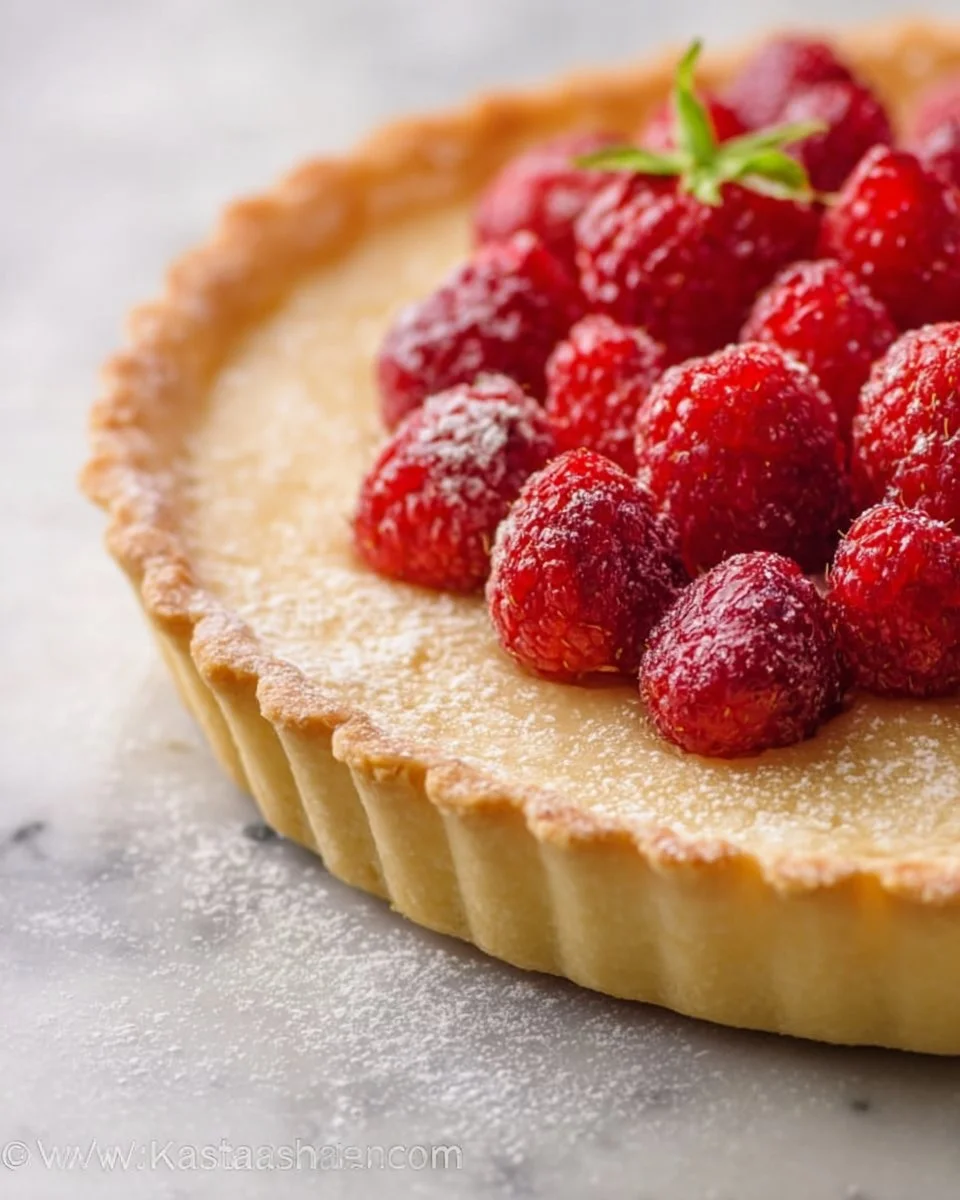
Cool and Fill
Let it cool completely before filling it with pastry cream and fresh fruit. This step allows the crust to settle, providing the perfect base for your indulgent dessert.
HOW TO STORE HOMEMADE TART CRUST
If you have any leftover tart crust, it’s a blessing because it holds up beautifully! At room temperature, it can stay fresh for about a day. For refrigeration, place it in an airtight container, and it will last 3-4 days. If you’re looking for longer storage, pop it in the freezer, where it will stay good for 2-3 months—just thaw it in the fridge overnight before using.
TIPS FOR SUCCESS
- Use ice-cold butter for the best texture. It helps create those flaky layers.
- Don’t overwork the dough; mix just until combined to prevent a tough crust.
- Chill the dough after mixing to prevent shrinkage during baking; patience pays off!
- Roll the dough evenly to ensure consistent baking; save thicker areas for the edges.
- Use a fork to create a decorative pattern on the edge for an elegant touch!
SERVING SUGGESTIONS
- Fill with fresh seasonal fruits and a light glaze for a refreshing treat!
- Serve alongside a scoop of vanilla ice cream for that perfect dessert duo.
- Drizzle with a rich chocolate sauce for a decadent finish.
- Pair with a dollop of whipped cream for an indulgent touch.
- Present on a decorative platter garnished with mint leaves for extra flair.
So there you have it, my beloved homemade tart crust recipe! Each step is filled with warmth, anticipation, and the promise of a delightful treat at the end. What will you fill yours with? I can’t wait to hear about your delicious creations!